[MP] Live2D Cubism Rigging
- courtneysanimation
- May 14, 2023
- 9 min read
Learning Live2D Cubism was daunting. There was a lot to learn in a short space of time. A lot of research went into the software before I could even begin to get my characters imported into the software. Henry encouraged me to do some tests with the software to see how difficult it was so I tried the tutorials that came with the software first.
I should also note that there is too much to discuss on Live2D and my findings that wont fit in the 5000 word count so I've condensed it to the most important parts.
Tutorial
I downloaded Live2Ds model : Mark-Kun. Its a very basic model with limbs, eyes a mouth and hair. You can find all of the samples here; https://www.live2d.com/en/download/sample-data/

(Fig 1. Mark-Kun Model provided by Live2D)
I followed the tutorial and made an eye blink which taught me all about the texture meshes, warp deformers, deformer paths and parameters. Doing so gave me an insight into how much you have to split up your layers when drawing the model to begin with (which is a lot). Once I had completed the eye blink tutorial I felt confident in the software, I still didnt know everything but I felt excited to see a model in motion and know that I had done that.
(Fig 2. Test using Mark-Kun)
The next task was finding out how to set up a model for rigging. I went in search online and found loads of resources on Twitter and Youtube, one user made an entire document on how to not only commission but make your own models for Live2D. With the guidance of this document and several others from Twitter I made a start on rendering my models for rigging.
To ensure Live2D models have clean 3D movement its important to break your models down into as many layers as possible. You also have to take into consideration how you want the physics to move. Each part of the model must have its own layer and should be named accordingly to ensure a rigger knows exactly what part of the body they're rigging, much like when making models for Duik.
There are several different methods to drawing your model;
Drawing the entire model as you would normally and then going back and using the lasso tool to cut out individual parts and separate them then extend the parts so that they can fit behind other parts.
Drawing each part one by one. Example; I would draw the face base without the fluff as its own layer, then on another layer would start drawing the fluff. This means you can work effectively and always be thinking of how each part will work with other parts instead of having to go back and think after its all drawn like in method one.
I opted for method 2. Below you can see how my first model was broken up. I worked on the cat first as I knew it had less details and parts in comparison to the anime model. I could easily learn the software with the cat and gauge how fast I could work.

(Fig 3. Hazel Cat Model Broken up)

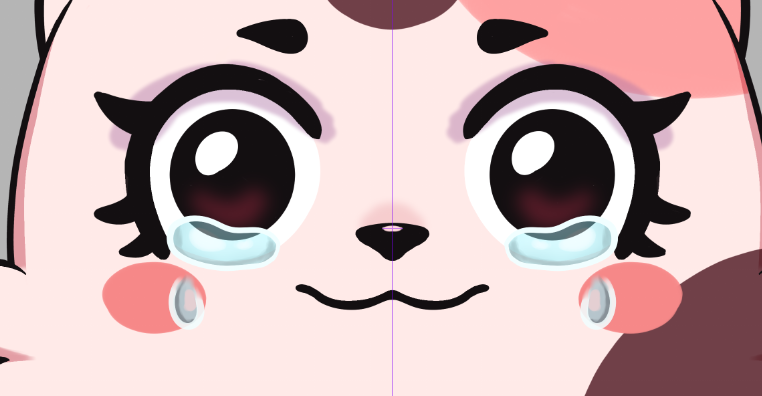
(Fig 4. Hazel Cat Model final Render)
Once the model was divided up I could start the rigging. The process itself was quite smooth sailing as there were plenty of tutorials online on Youtube to follow. I was able to learn quickly about creating meshes for my model and even went as far as learning how to create custom meshes that allowed me more control over how the parts could move.
The Head
I found it difficult to push the face into 3/4 views in both upper and lower positions, especially when I added in the eyes, mouth, nose and eyesbrows. Live2D offers an option called 'Synthesize corners' which takes your already keyed X and Y parameters and auto positions the corner parameters. The issue with this is its not always clean looking so you have to go in and manually fix the position of certain meshes. It works as a good base to start with however. My examples below aren't perfect, some parts still look wonky and if I had more time I would've polished it more but I had to work within the time I had.
(Fig 5. Face XYZ with just eyes)
(Fig 6. Face XYZ with Facial parts)
The Mouth
The first real issue that came up however was the mouth, which is the most important part of the model that helps improve how life-like it looks. I followed several different mouth tutorials including;
(Fig 7. Mouth Rig tutorial by Inkugaki VT / Youtube)
(Fig 8. Mouth Rig tutorial by Cutie Draong / Youtube)
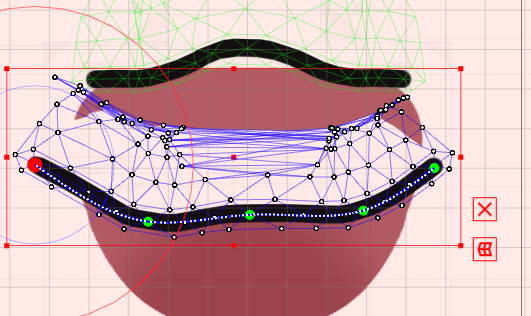
Initially I had drawn her mouth to be in the smiling position however found that the mesh was distorting into odd positions when I would try and make different mouth shapes. My first idea to fix this was to go back and alter the mouth mesh to have more polygons. However I still found the mouth was pulling and stretching into odd positions when I did this.
(Fig 9. Errors with the mouth and trying to fix the meshes)
After searching twitter and asking riggers on the Live2D reddit page, I found out that if your model has a lip like mine when smiling you should initially draw the mouth as a staight line so that it does not warp or bend out of shape once you start to push it into positions. I went back into ClipStudioPaint, fixed both the top and bottom lip to be straight lines and found my problems we're solved. It looked a bit silly at first but worked well.

(Fig 10. Fixing errors by creating a straight line with the mouth)
(Fig 11. Mouth fixed and working)
The eyes
I came across the exact same problem with the eyelast line. I followed the same steps to fix it and ended up redrawing it into its closed position which seemed to work better. The overall shape of the lash-line was going to cause some distortions to begin with but making this change eliminated some of the errors. If I were to remake the model I would split the eyelash up further into two parts.
(Fig 12. Error with eyelash line)
Other than these errors the rest of the model was easier to rig and I found the more I worked on her the faster I became with rigging and the less I had to look at tutorials as I was developing my own knowledge bank of the software. I even went as far as testing out the physics settings and doing both eye jiggles, cheek jiggles and making her moon jewel swing with her head movements. I also attempted a tail sway which (again) had the same issues as the eyes + mouth, it needed to be straightened to sway properly. There was a big learning curve doing physics, depending on how much movement you wanted, you had to layer deformers under other deformers correctly or else you could have unwanted movement. I'm happy though with the physics I did do, a lot of the settings were me just messing around with numbers still I was satisfied. Below you can see an indepth video on the physics settings + parameters.
(Fig 13. Video of Paramters + Physics)
I attempted making toggled reactions that would help with audience engagement and narrative during streams. Click through to see different expression assets. When used on the model, the facial capture will change things like the eyebrow positions and mouth positions.
(Fig 14. Emotions drawn)
(Fig 15. Emotions toggled to .json files for export)
(Fig 16. Final model test)
Overall im happy with the above outcome for it being my first model rigged in Live2D. Above you can see a video of me using the tracking software and capturing my face on Hazel. Of course there are issues, the mouth movement wasn't smooth which came down to
Poor mouth rigging
little webcam lighting
no Vbridger plug in for enhanced mouth tracking
tail could've been rigged smoother
overall tracking could be enhanced with tweaked the settings.
But I left this model here as I knew I wanted to get started on the anime model asap as she had more parts to rig and would take up more time.
Anime Model
Drawing out the render for the anime model I followed the same method as the previous model except there were more parts to consider.

(Fig 17. Texture Atlas)

(Fig 18. Unshaded Full render of Hazel)
The Hair
The most complicated part. I noticed in some models hair almost looked flat which I did not want for Hazel. I found this tutorial that explained hair should be on multiple planes to make it 3D looking.
(Fig 19. @MikazukiBlue Hair Tutorial)

(Fig 20. Hazel Hair Divisions)
To ensure fluid movement Hazels hair was divided up into multiple sections. The hardest part that came with detailed hair was making the hair look accurate when doing head XYZ angles.
The head
Having a human looking head proved to be more of a challenge than the cat head. There were more ways to make the head look wrong, especially if you didnt understand how eyes and noses looked from different angles and the most difficult was the hair. I worked with what I could and utilised 'Synthesize corners' to act as a guide. I bought several guides and looked at other example models to get it as accurate as I could with her art style. There's still a lot I could've fixed with the head angles but I'm content with how they look for now.
(Fig 21. Head study file by @mochimochibubu /Twitter)
(Fig 22. Hazel Base Head XY)
(Fig 23. Hazel Hair Head XY)
Hip Sway Glue
I wanted to add dynamic movement to Hazels XYZ body movements so I curated an addtional hipsway to her model. However to do this I found I had to learn a more advanced technique in Live2D called Glue. This involves taking two separate meshes and combining the polygons so that they stretch and move together rather than rigging movement individually. I was able to find a tutorial on this and followed it.
(Fig 24. Hip Sway and Glue tutorial by YoshinoArt / Youtube)
However even after trying glue I found my mesh was still deforming on rotation. To overcome this I broke down both meshes further into more polygons which allowed more freedom of movement. I wish I had learnt glue sooner as it was a life saver for making two meshes move smoothly together. I would've used it for my mouth if I hadn't of already rigged it. I did use it later on when I rigged animated movements in the arms.
(Fig 25. Error + Mesh Fix for Hip sway)
Tail Sway
To improve from my previous models tail sway I found a better tutorial that explained another advanced technique called Skinning which allows Live2D to make its own rotation deformers and parameters for you. This time I made sure to keep the tail as straight as I could. I found this technique was able to make the tail more fluid and by tweaking the physics settings I could get it to sway to a level and degree I wanted! I wish I had known about it sooner as it cut down rigging time significantly.
(Fig 26. Tail Sway Tutorial by Moki/ Youtube)
(Fig 27. Hazels Improved Tail Sway)
The Physics
Since working on my previous model I started to build my own knowledge on how areas in Live2D work. I cant deny Physics is still almost a guessing game to me but I do have a stronger understanding of how the different volumes work. I hope that as I continue to make Live2D models I can study physics more indepth. For the anime model most of my physics was freehand with some tutorials used here and there but I felt more confident doing it on my own than previously. Below is a list of all physics and a video showing each;
Hair XYZ Sway
Eye Blink Jiggle
Ear Jiggle > Connected to Head XY + Eye Blink
Ribbon Sway
Jewellary Sway
Breast Jiggle
Belt Sway
Constellation Wiggle
Body Bounce on movement
Arms Bounce
Leg Bounce
Breath
Wings Sway > Connected to Breath
Tail Sway > Connected to Breath
(Fig 28. Video of human models physics)
Attempting Animation
Live2D does come with some very basic animation functions including its own graph editor. I made some extra hand assets for Hazel to create and arm wave and a peace sign animation to allow more audience engagement and story telling. I followed a few tutorials on how to do this. I did this in the last few weeks before submission so it was extremely rushed and I had no time to polish these animations. If I had more time I would've gave them more attention and paid more attention to basic animation principals but I tried my best to work with what I had by adding drag to the swaying of her hands during the motions to make it seem more realistic but thats as far as I went. I did also attempt a tears falling animation, Henry and I discussed how the tears moved too fast on the model. Again I didnt have time to fix this and would've done so if I managed my time better.
(Fig 29. Showing Motion Capture and Animations Toggled)
I'm extremely proud of myself for learning a software from scratch within a matter of months. I've been constantly working on improving my skills with each new task on both models. I may not have been able to design and rig all the outfits for Hazel or all the animations Henry and I spoke about for my Major Project but I did learn so much and teach myself everything to do with this software on my own with the help of youtube tutorials. Of course there is much more I could've focused on but with what limited time I had, I had to pick and choose the most important areas I wanted my model to have. Rigging characters onLive2D is something I've come to really enjoy and it has me curious on how to rig in Duik on After Effects since a lot of these skills are transferrable! Overall I'm over the moon with how well my models turned out and I think I've enhanced my skills well for graduating. In my next post I'll talk about the motion capture, toggled reactions + making the debut video.
















![[MP] Ideation + Pre-Production](https://static.wixstatic.com/media/fa5887_6eccb9320ca5448498c063547247696c~mv2.png/v1/fill/w_980,h_541,al_c,q_90,usm_0.66_1.00_0.01,enc_avif,quality_auto/fa5887_6eccb9320ca5448498c063547247696c~mv2.png)
Comments